
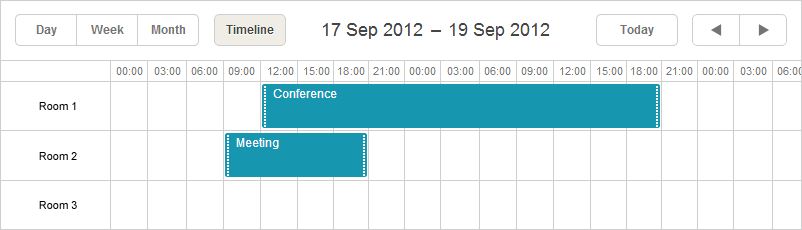
Timeline view
Initialization
public ActionResult Index() {
    var sched = new DHXScheduler(this);
    var context = new DHXSchedulerDataContext();
    ...
    var timeline = new TimelineView("timeline", "room_id");//initializes the view
    sched.Views.Add(timeline);//adds the view to the scheduler
    timeline.AddOptions(context.Rooms);//defines Y-Axis items. 'Rooms' is the name of mapping data table

    return View(sched);
}
where
- timeline - the name of the view.
The constructor requires the 'name' cause the view can exist in the scheduler in several instances. - room_id - the name of a property that will be used as the id of units.
For each LINQ to SQL designer file added to the solution, Visual Studio automatically generates a LINQ to SQL DataContext class. DataContext class used in the code samples named as DHXSchedulerDataContext.
Properties
- Dy - (integer) the minimal height of cells (if the SectionAutoheight parameter has value 'false', the height of cells will be equal to Dy. Otherwise, the height will be increased to fill all free space).
- EventDy - (integer) the height of the event box.
- EventMinDy - (integer) the minimum height of the event box.
- FullEventDy - (boolean) specifies whether the event must occupy the entire cell (EventDy value will be ignored in that case)
- FitEvents - (boolean) defines whether the height of cells should be flexible or fixed (Dy property). The default value - true.
- FolderDy - (integer) the height of folders in pixels (non-applicable to cells with folder names).
- FolderEventsAvailable - (boolean) set the parameter to 'true' if you want to have the possibility to specify an event not only for an individual holder but also for the whole folder (any level). Used for the 'Tree' mode.
- Label - (string) the text label. The default value - 'Timeline'.
- Name - (string) the name of the view. Applicable just to the Units and Timeline views cause they can be presented in the scheduler in several instances. For other views the property is read-only and names are taken by default.
- Property - (string) the name of a property by which events are divided to units.
- RenderMode - ('Bar','Cell' or 'Tree') the mode of the view.
- ResizeEvents - (boolean) specifies whether the height of events must be decreased to fit the section height. By default - true.
- SectionAutoheight - (boolean) sets automatic height adjustment for cells.
- TabClass - (string) the name of a css class that will be applied to the tab.
- TabPosition - (integer) the right offset of the view tab in the tabbar. By default, tabs go right-to-left in the order of addition to the scheduler.
- TabStyle - (string) the style that will be applied to the tab.
- TabWidth - (integer) the width of the tab
- ViewType - (string) the type of the view. The property is read-only.
- X_Date - (string) the date format of the X-Axis. See available variations of the format string here.
- X_Unit - (minute, hour, day, week, month, year ) the scale unit.
- X_Step - (integer) the number of X_Steps needed to display on the screen.
- X_Size - (integer) the minimum scale interval calculated in X_Units.
- X_Start - (integer) the minimum value of the scale.
- X_Length - (integer) defines the time value that will be applied when the user clicks on the next button in the scheduler's header. It's a bit knotty parameter and to not make a mistake, remember the following:
- you can use the parameter only if X_Unit=TimelineView.XScaleUnits.Minute or X_Unit=TimelineView.XScaleUnits.Hour. In other cases, the parameter doesn't need specifying at all.
- if X_Unit=TimelineView.XScaleUnits.Minute or X_Unit=TimelineView.XScaleUnits.Hour and you don't specify X_Length, the scale will display the time interval (not the whole day as usual) specified by
the remaining scale parameters (X_Start, X_Step, X_Size). This allows you to divide the day into equal time intervals (hours) and display them on different pages.
- if X_Unit=TimelineView.XScaleUnits.Minute or X_Unit=TimelineView.XScaleUnits.Hour and you decide to set the parameter, set it to all day (i.e. X_Length should be equal to the number of X_Steps needed to fill the whole day) to provide corrent work of the 'next' button.
- Y_Property - (string) the event property that will be used as a template for Y-Axis items.
var timeline = new TimelineView("timeline", "room_id");//initializes the view
timeline.FitEvents = false;
timeline.X_Unit = TimelineView.XScaleUnits.Hour;
timeline.X_Step = 30;
timeline.X_Size = 24;  // (8PM - 8AM)/30min
timeline.X_Start = 16; // 8AM/30min
timeline.X_Length = 48; // 24/30min
Second X-Axis
The second X_Axis is placed in the top of the default one and serves to group time intervals of the original scale.
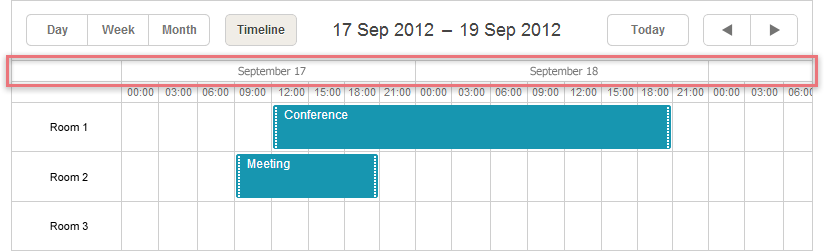
You can add it by means of method AddSecondScale():
var timeline = new TimelineView("timeline", "room_id");
timeline.AddSecondScale(TimelineView.XScaleUnits.Day,  "%F %d");
The method takes 2 parameters:
- The scale unit. Possible values are minute, hour, day, week, month, year.
- The date format. See available variations of the format string here.
Modes
The view can be used in 3 modes:
- Bar

- Cell (default value)
- Tree
The desired mode is set by parameter RenderMode.
var timeline = new TimelineView("timeline", "room_id");
timeline.RenderMode = TimelineView.RenderModes.Tree;
Data for Y-Axis
'Bar' and 'Cell' modes
In general, to set values for the Y-Axis in the 'Bar' and 'Cell' modes you should use method AddOptions().
The method can take 2 types of data:
- Object of the TimelineUnit class (IEnumerable<TimelineUnit>)
timeline.AddOption( new TimelineUnit("1", "Department 1"));
- Object of any class inherited from System.Object (IEnumerable<object>)
var rooms = new List<object>(){
                new { key = "1", label = "Room 1"},
                new { key = "2", label = "Room 2"},
                new { key = "3", label = "Room 3"}
};

timeline.AddOptions(rooms);
Note, to be correctly processed data items must have 2 mandatory properties:
- key - the id of an item;
- label - the text label of an item.
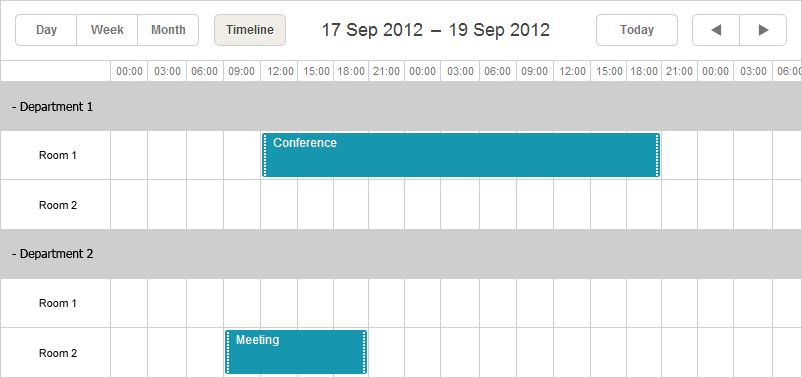
'Tree' mode
The 'Tree' mode allows defining hierarchical structure of items.
Here you have 2 variants to choose from:
- To add items individually.
var timeline = new TimelineView("timeline", "room_id");
timeline.RenderMode = TimelineView.RenderModes.Tree;

var section = timeline.AddOption( new TimelineUnit("1", "Department 1", true));//adds folder to the axis
section.AddOption( new TimelineUnit("2", "Room 1") );// defines the items of the folder
section.AddOption( new TimelineUnit("3", "Room 2") );

var section2 = timeline.AddOption( new TimelineUnit("4", "Department 2", true));
section2.AddOption( new TimelineUnit("5", "Room 1") );
section2.AddOption( new TimelineUnit("6", "Room 2") );
where the TimelineUnit constructor takes 3 parameters:
- The id of a folder;
- The text label of a folder;
- Defines whether a folder will be opened initially (optional).
- To add a collection(s) of items.
var context = new DHXSchedulerDataContext();
var timeline = new TimelineView("timeline", "room_id");
timeline.FolderEventsAvailable = false;
timeline.RenderMode = TimelineView.RenderModes.Tree;
foreach (var department in context.Departments)
{
        TimelineUnit section = new TimelineUnit(department.Id, department.Title);// defines the header of the folder
        timeline.AddOption(section);
        section.AddOptions( department.Rooms );//'Rooms' in the name of model data table
}
sched.Views.Add(timeline);
Note, if for specifying the axis you use a data collection (not model objects), its items must have 2 mandatory properties (the same as for the Bar and Cell modes) in order to be correctly processed: key and label.
Loading data to the view
Unlike basic views (such as Day, Month, Year etc.), multiple-resource views(that are Units and Timeline) require data items to have one more mandatory field:
- unit_id - (string) the unit id. The name can vary but must coincide with the 2nd parameter passed to the view constructor.
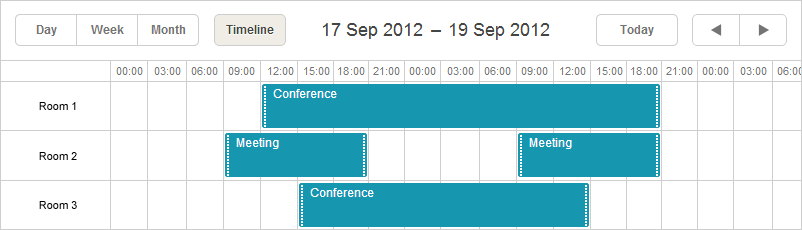
public ActionResult Index()
{
       var sched = new DHXScheduler(this);
       var timeline = new TimelineView("timeline", "room_id");
       sched.Views.Add(timeline);
       timeline.AddOptions(new List<object>{
                new { key = "1", label = "Room 1"},
                new { key = "2", label = "Room 2"},
                new { key = "3", label = "Room 3"}
       });

       sched.LoadData = true;
       return View(scheduler);
}

public ActionResult Data()
{//events for loading to scheduler
        var items = new List<object>(){
              new { id = "1", text = "Conference", start_date = "17.09.2012 12:00",
                                                    end_date = "18.09.2012 21:00", room_id = "1"},
              new { id = "2", text = "Meeting",    start_date = "17.09.2012 09:00",
                                                    end_date = "17.09.2012 21:00",  room_id = "2"},
              new { id = "3", text = "Meeting",    start_date = "18.09.2012 09:00",
                                                    end_date = "18.09.2012 21:00",  room_id = "2"},
              new { id = "4", text = "Conference", start_date = "17.09.2012 15:00",
                                                    end_date = "18.09.2012 15:00",  room_id = "3"}
       };

       var data = new SchedulerAjaxData(items);
       return data.Render();
}
comments powered by Disqus